How to Display Handmade Home Crafts in Creative Ways

Time:2026-11-11 Author:Aria
0%

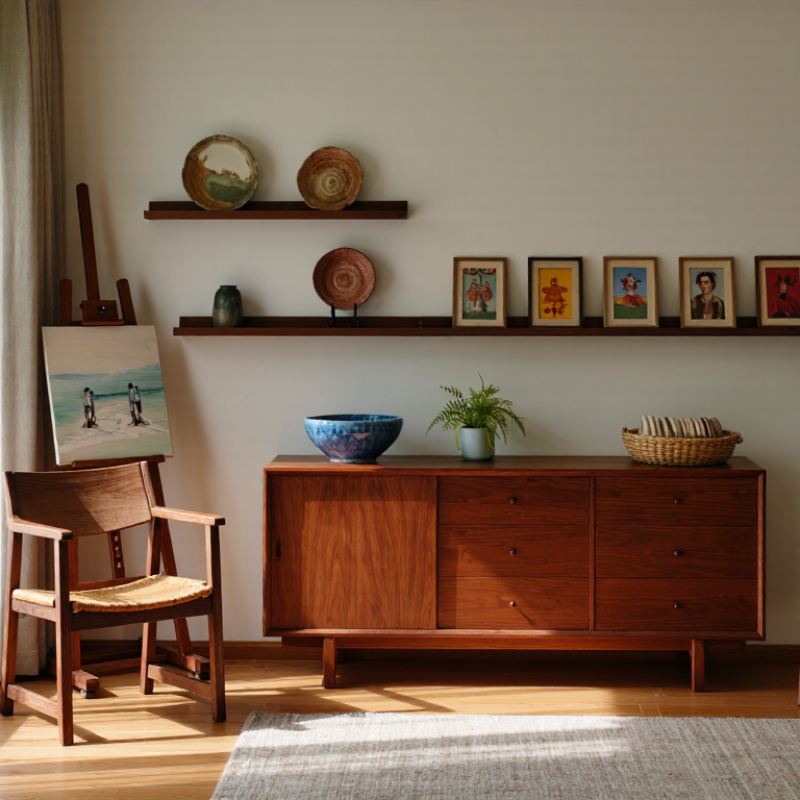
Handmade crafts deserve more than a crowded shelf or a forgotten corner. Creative Ways To Display Handmade Home Crafts explores how thoughtful placement can make pottery, woven pieces, small paintings, and family-made objects feel connected to a room. A blue-glazed bowl beside a sunlit window can become a quiet focal point. A row of tiny framed prints can give a plain hallway character. Small choices matter.

The market context is encouraging, but it needs careful interpretation. Grand View Research’s Arts and Crafts Market report estimated the global market at USD 50.9 billion in 2023, with projected growth through 2030. That figure reflects broad consumer and commercial activity; it does not prove that every home needs more decoration. Useful context, not a decorating rule. William Morris, the British designer and craft advocate, wrote in his 1880 lecture “The Beauty of Life”: “Have nothing in your houses that you do not know to be useful, or believe to be beautiful.” His advice still offers a grounded test for displaying handmade work.

This guide turns that idea into practical choices: grouping objects by color, varying shelf height, using picture ledges, and giving fragile pieces stable support. It also considers light, dust, and visual clutter—details that photographs often hide. Not every arrangement will work. A collection can feel crowded, even when each object is lovely. That is worth noticing. The aim is not a showroom, but a home where handmade pieces feel seen, used, and genuinely yours.
How to Display Handmade Home Crafts in Creative Ways

Assess Each Craft’s Materials, Weight, and Conservation Needs

Before arranging a handmade craft, record its materials, dimensions, and weight. A small kitchen scale can reveal surprises: a clay bowl may weigh more than its delicate shape suggests. Check the mount’s stated working load and the wall material; a fastener rating alone does not describe the whole installation. Use a broad, padded support for fragile edges, and keep hanging pieces away from doors that slam. Not every craft needs a shelf.

Material affects conservation. Dyed yarn, paper, and natural fibers can fade or weaken under strong light, while wood and clay respond differently to moisture. The Canadian Conservation Institute’s guidance, “Light, Ultraviolet and Infrared,” recommends limiting highly light-sensitive objects to 50 lux. Its humidity guidance identifies about 50% relative humidity as a common planning target, with object history and material affecting what is appropriate. A small light meter and humidity monitor make conditions easier to check. I would not assume one reading solves everything; sunlight shifts across a room, and that is easy to miss. Rotate vulnerable pieces, avoid sunny windows, and inspect supports for sagging or color transfer.

Set Wall Displays at the Common 57-Inch Gallery Centerline

A wall display feels intentional when its visual center sits near eye level. A common gallery guideline places the center of the arrangement about 57 inches from the floor. Measure to the midpoint of the whole grouping, not the top edge of its largest piece. For handmade crafts, this can mean arranging a woven basket, small framed print, and ceramic ornament on the floor first. Adjust their spacing until the shapes feel balanced, then measure the arrangement’s center and transfer that height to the wall. The guideline is helpful, not exact. A tall viewer or low ceiling may call for a small adjustment.

Tips: Use painter’s tape to mark the 57-inch line. Hang paper templates before making holes. Keep heavier pieces securely supported. Step back and check the view from the doorway, too.

Craft displays often mix unusual shapes and different weights, so equal gaps may look stiff. Try leaving more room around a bulky textile and less around a small, flat frame. If the display hangs above a sofa or console, keep enough clearance for comfort, while treating the furniture as part of the composition. I once found a carefully measured grouping looked oddly high beside a low chair. That happens. Recheck the centerline from the places where people actually sit and stand, and shift the layout slightly if it feels more natural.

Limit Light-Sensitive Crafts to 50 Lux, per Canadian Conservation Institute Guidance

Handmade crafts deserve a display that protects their color as well as showing their character. Canadian Conservation Institute guidance uses 50 lux as a recommended limit for highly light-sensitive objects, including many works on paper and dyed textiles. Lux measures the light falling on an object, so check the display surface rather than relying on a bulb’s packaging. A small watercolor might sit inside a shadow box, while a woven piece could hang on a wall away from windows. Soft lighting helps. Sunlight can cause fading even when a room feels pleasantly dim.

Light damage accumulates over time. A craft exposed to 50 lux for many hours may still receive a substantial total dose, so consider shorter display periods and rotate fragile pieces with sturdier objects. Use a lux meter when possible, and keep lamps far enough away to prevent heat buildup. UV-filtering glazing can reduce ultraviolet exposure, but it does not stop visible light from fading materials. I find this part easy to underestimate; a pretty window display is not always a safe one.

Tips: Keep sensitive crafts out of direct sunlight. Measure light at the object. Draw curtains during bright hours, and store resting pieces in a cool, dark place. If you cannot reach 50 lux, display the craft briefly, then rotate it.

How to Display Handmade Home Crafts in Creative Ways - Limit Light-Sensitive Crafts to 50 Lux, per Canadian Conservation Institute Guidance

Handmade Craft Creative Display Idea Light Guidance Practical Care Tip
Hand-dyed fabric wall hanging Hang it against a neutral backing as a small textile-art panel. For light-sensitive dyes and textiles, keep illumination at or below 50 lux. Keep it away from direct sunlight and rotate it out of display periodically.
Handmade paper collage Frame it with a mat and display it in a shaded reading nook. Treat colored paper, inks, and other light-sensitive components as a 50-lux display. Use UV-filtering glazing where appropriate; it reduces UV exposure but does not prevent fading from visible light.
Watercolor or ink illustration Create a rotating mini-gallery with one framed work on view at a time. Watercolors, drawings, and many works on paper are commonly limited to 50 lux. Measure light at the artwork surface and avoid placing the frame opposite a bright window.
Pressed-flower artwork Display in a shallow shadow box with a simple, pale background. Dried plant materials can be light-sensitive; use a conservative limit of 50 lux. Choose a location without direct sun or heat, and keep the display period limited.
Handwoven natural-fibre basket Use it as a tabletop centrepiece or wall-mounted sculptural accent. If it is dyed or otherwise light-sensitive, keep it at or below 50 lux; assess undyed materials individually. Avoid prolonged sunlight, which can fade dyes and weaken many plant fibres.
Glazed ceramic bowl Group it with complementary shapes on an open shelf or dining table. Ceramic itself is generally not light-sensitive; the 50-lux limit is not automatically required. Check for delicate painted or organic components, and secure the bowl against accidental knocks.
Wool or cotton embroidery Display it in a frame or rotate it seasonally as a textile accent. Textiles and colored threads can be highly light-sensitive; use no more than 50 lux. Keep exposure brief and avoid sunlight; UV control alone cannot stop all visible-light fading.

Note: The Canadian Conservation Institute guidance commonly recommends a maximum illuminance of 50 lux for highly light-sensitive materials. Lux should be measured at the object surface. Actual sensitivity varies with materials, dyes, condition, and exposure time; the suggested display ideas and rotation tips are practical precautions, not fixed CCI schedules.

Arrange Shelf Displays with Varied Heights, Color, and Negative Space

Treat a shelf like a small landscape, not a lineup. Give taller pieces, such as a narrow vase or framed print, a place near the back. Bring shorter bowls and carved figures forward, where their details remain visible. Vary the heights, but let a few shapes repeat so the arrangement feels connected. Try grouping three objects, then shifting one slightly off-center. It often looks more natural than a perfectly balanced row. Leave room to breathe.

Color can tie handmade pieces together without making them look identical. Echo one muted shade in two or three objects, then let a brighter piece stand on its own. Keep some shelf surface clear; negative space helps intricate textures and uneven glaze catch the eye. A palm-sized gap can be enough. Step back and check the display from the doorway, not only up close. If everything feels crowded, remove one item before adding another. I sometimes find that a carefully planned grouping still looks stiff, so changing the spacing by an inch or two can help. Secure anything heavy or fragile, and avoid placing delicate work where it may be bumped during daily use.

How to Display Handmade Home Crafts Creatively

Example shelf plan: handmade pieces at varied heights (cm)

This illustrative arrangement mixes taller and shorter pieces to create visual rhythm. Leave some shelf area open, and balance contrasting colors and textures so each handmade object has room to stand out.

Secure Handmade Objects with Stable Supports and Museum-Style Mounting Methods

How to Display Handmade Home Crafts in Creative Ways

A secure display starts with the object’s weight, shape, and material. A small ceramic bowl may sit safely on a level shelf, while a tall woven sculpture needs a broad, hidden base. Check for rocking before adding decorative pieces nearby. Small shifts matter. Use padded, inert supports that touch sturdy areas, not delicate edges or loose fibers. For irregular forms, a fitted cradle can spread pressure more evenly.

Museum-style mounting keeps objects steady without making the display feel crowded. Choose clear or color-matched supports, and use soft ties only where they cannot pinch or abrade the surface. Avoid relying on ordinary tape or glue; adhesives can stain finishes and become difficult to remove. Place fragile items away from direct sun, heating vents, and busy walkways. A setup may look balanced but still tip when a shelf is bumped, so test it gently and reassess after cleaning. For unusually delicate or valuable crafts, ask a qualified conservator about suitable materials.

Tips: Photograph the object before mounting. Keep small fittings labeled nearby. Avoid rushed fixes. Check supports every few months, especially after moving furniture or noticing dust collect beneath the base.

FAQS

What light level is recommended for light-sensitive crafts?

Keep highly sensitive pieces near or below 50 lux. Measure light at the object, not at the bulb.

Does keeping a craft at 50 lux prevent fading?

No. Light damage accumulates over time, even at low levels. Display fragile pieces for shorter periods and rotate them.

Where should I display a small watercolor or woven piece?

Keep it away from direct sunlight. A shadow box or a wall away from windows can help.

Do UV-filtering panels stop all light damage?

No. They can reduce ultraviolet exposure, but visible light may still fade materials. Easy to forget.

How can I check whether a display is too bright?

Use a lux meter at the craft’s surface when possible. Draw curtains during bright hours if sunlight reaches it.

How should I arrange objects on a shelf?

Place taller pieces near the back and shorter bowls or figures toward the front. Leave room to breathe.

How can color and spacing make a shelf display feel connected?

Repeat a muted shade in two or three objects, then let one brighter piece stand alone. Try shifting an item by an inch.

What should I do if a shelf looks crowded?

Remove one object before adding another. Step back and check the view from the doorway; I still sometimes miss the clutter up close.

Conclusion

Creative Ways To Display Handmade Home Crafts begins with understanding each piece. Consider its materials, weight, shape, and conservation needs before choosing where and how to show it. Lightweight textiles, fragile ceramics, and sturdy wooden objects may each need different surroundings and support. For wall displays, position the visual center of a piece or grouping around 57 inches from the floor, adjusting when needed to suit the room and the objects.

On shelves, create interest by varying heights, balancing colors, and leaving open space so each craft can be appreciated. Protect light-sensitive items by keeping illumination low, around 50 lux as indicated in the outline, and avoid placing delicate pieces in strong direct sunlight. Use stable bases, discreet supports, and secure mounting methods to reduce the risk of shifting or falling. Thoughtful placement combines visual variety with practical care, helping handmade objects remain both safely displayed and easy to enjoy.

Aria

Aria

Aria is a dedicated marketing professional with a deep passion for innovative strategies and a keen understanding of our company's product offerings. With a wealth of experience in the industry, Aria excels at crafting engaging content that highlights the unique features and benefits of our......